MiniatureBuildings.co.uk : Exploring model buildings of all sizes and styles
- Page (top)
- Home
-
About
Us -
Recent
Articles -
Scales &
Uses - Modelling
-
All
Articles
Miniature Buildings
(top of page)
Home
Articles
- Miniature
Buildings - Home +
-
Recent
Blogs -
All
Articles
.
Miniature Buildings
Some thoughts on building models of all types and sizes
Some thoughts on building models of all types and sizes
Welcome. If you have not visited Minature Buildings before can I suggest you begin with my Aims and Scope article or at the Home Page. If you have visited before - welcome back. I hope this article is of interest to you.
St Thomas's Church
from Petite Properties
.jpg)
I see a lot in recent times of Petite Properties who seem to succesfully bridge the Dolls House and Model Railway communities as well as serving those (like me really) who simply like buildings. Without the need for tracks, engines, dolls or furniture. Typically, I did not select one of their simpler models but chose to go for their St Thomas's church model in 1/148 scale. Maybe a bit ambitious. We will see.
You may find the tenses in this article a bit strange, for which I apologise. It is a mixture of comments written at the time I was at the relevant stage and of thoughts added at the end when the consequences of my choices had become clear.
First impressions were good. Neatly packed, good quality card, what look like sensible instructions and lots of detail components including printed acetate windows. I am, as they suggest, in need of a fine tip glue applicator.
.jpg)
There seem to be too many components and too many edges to glue to attempt a dry-run before starting real assembly. I did however try the first few steps to get a feel for the fit. It seems to be neat and precise. However I was aware that even with pieces only about 7cm long (the nave sides) there was slight bowing of the card. This was especially noticeable on the 15cm long base. I see nothing in the instructions that suggests I cannot mount the thin card base on something thicker and more stable. One thing I do really like is that the tabs on the walls slot into the base but do not poke through.
As discussed later, I chose to use a texture paper for the walls. With the benefit of hindsight I would, before beginning assembly, have used the wall components and window surrounds as a template for cutting out the paper sections. The process of putting it together is straightforward but does need care and some clamps. It is not simply clicking pieces of Lego together.
.jpg)
I have now finished the main carcass construction and am very impressed. It all fitted together very neatly. I'm glad though that I mounted it on a base - an offcut of 5mm plywood.
.jpg)
As suggested in the PP instructions - as a 'top tip' - I then moved to decorating the exterior of the church. Before adding the stained glass or the roofs.
The supplied instructions (which are pretty clear) say to apply the window surrounds, lintels, wall supports and masonry bands at this point. If you are going to apply a paint finish - which is the example finish described in the instructions - this makes sense. However (just to make my life difficult) I chose to use a flint texture paper for the walls. I had only fixed one window surround before I realised how impossible it would be to cut the paper to shape after doing this. More haste, less speed. Again. Taking the window off did cause a bit of damage.
It was also a big mistake at this point (made in a rush to get on and see how it would look) to stick the 'stone' strips around the tower before adding the flint paper. Which meant a lot of fiddly measuring and cutting in order to fit the flint paper between the strips. Next time paper first, then the bands around the tower. Remembering of course to give a couple of coats of paint to the masonry bands before fixing them.
.jpg) The point where I realised just how much work finishing this model involved.
The point where I realised just how much work finishing this model involved.
You will see from the picture how impatient I am. A more patient modeller would have done all the window painting first, then all the papering and then all the trim. But that isn't me. I was trying things as I went along and wanted to see how it's going to work.
Although I think of myself as being careful and fussy, and the PP components are very precisely sized and cut, I still found the need to fill and sand the joins of the walls and, especially, the crenallations which I did rather struggle with. My favourite filler (at least for this scale of work) in the orange tub is Albastine Haarscheur Vuller - hairline filler. Alabastine is the NL brand of Ako Nobel who also make Polyfilla so I guess there is an equivalent UK product. The maroon paint is Rustin's Red Oxide metal primer, which I use a lot. It dries wonderfully flat without a lot of brush marks and then sands perfectly - while disclosing all the imperfections in the underlying structure. Only once I'm happy with the smooth finish in red do I move to the top coat(s).
Ideally I would have used the wall sections as a template for marking out and cutting the paper sections. As it was, I needed to measure each piece - paying particular attention to the position of the windows. These need to be cut out before the paper is applied. In this scale the technique of folding wall texture paper back through window openings was not going to work for me. And the stone window frames, mullions and surrounds make it inappropriate in this particular building. The importance of getting the exact cutouts for the paper to cover the walls (and my failure to do so) became horribly obvious later in the process.
.jpg)
Another thing that is best done before the paper is applied is to put at least a first coat of paint onto the window openings. Probably two. It can be done later but doing it first is so much easier. My choice for the window stone colour, and for the wall supports, was Humbrol Matt 94. Some might find it a little too dark but I generally like my model buildings muted rather than bright.
I began with the chancel. For the cladding paper I used Scalescenes TX55_00 Flint, reduced to 50%. Normally I would print wall textures on matt paper but given it was flint I used a photo paper and at least in this small scale it seemed to work.
In a larger scale model I would always try to fold a wall texture around the corners of the building but with the lack of courses in flint, the wall supports at the corners and the scale I was content not to do this. With the benefit of hindsight I was wrong. Even though I always try to remember to colour the edge of paper coverings, the joins are too obvious.
I made other mistakes in applying the flint paper. One was thinking about the tower and the nave separatly. Which meant I ended up with a visible join where the two meet. Also visible in the photo on the right. I should have cut the paper in bigger sections to avoid or minimise these joins. Oh, and one more thing - print all the paper you need in one go - or document the print settings. Or, like me, you will find you didn't quite match the colour when you had to print some more.
Once the paper was on, I could then apply the window surrounds. Again, they can be painted after being fitted but I think it is better to put a couple of coats on first. I was really impressed with the fine detail of the window surrounds and the window mullions and tracery in the wall sections. Amazing work from Petite Properties. To fix the window surrounds I chose to use a dry adhesive rather than a liquid glue, even with the benefit of a fine nozzle applicator.

Not everyone will be familiar with dry adhesive. It is clever and useful stuff. The brand I use is NanoTac, bought at an art supplies shop in the Netherlands. Perhaps I should start imirtng it to the UK. The yellow sheet is sticky on one side, covered with a sort of greaseproof white paper. First take a section of the sheet and peel back the white cover. You then press the object you want to stick onto the sticky yellow sheet, pressing firmly to get a good contact. The yellow paper is then peeled off leaving the object you are working on with the dry glue evenly transferred onto it. It can then be stuck where it is intended. Magic.
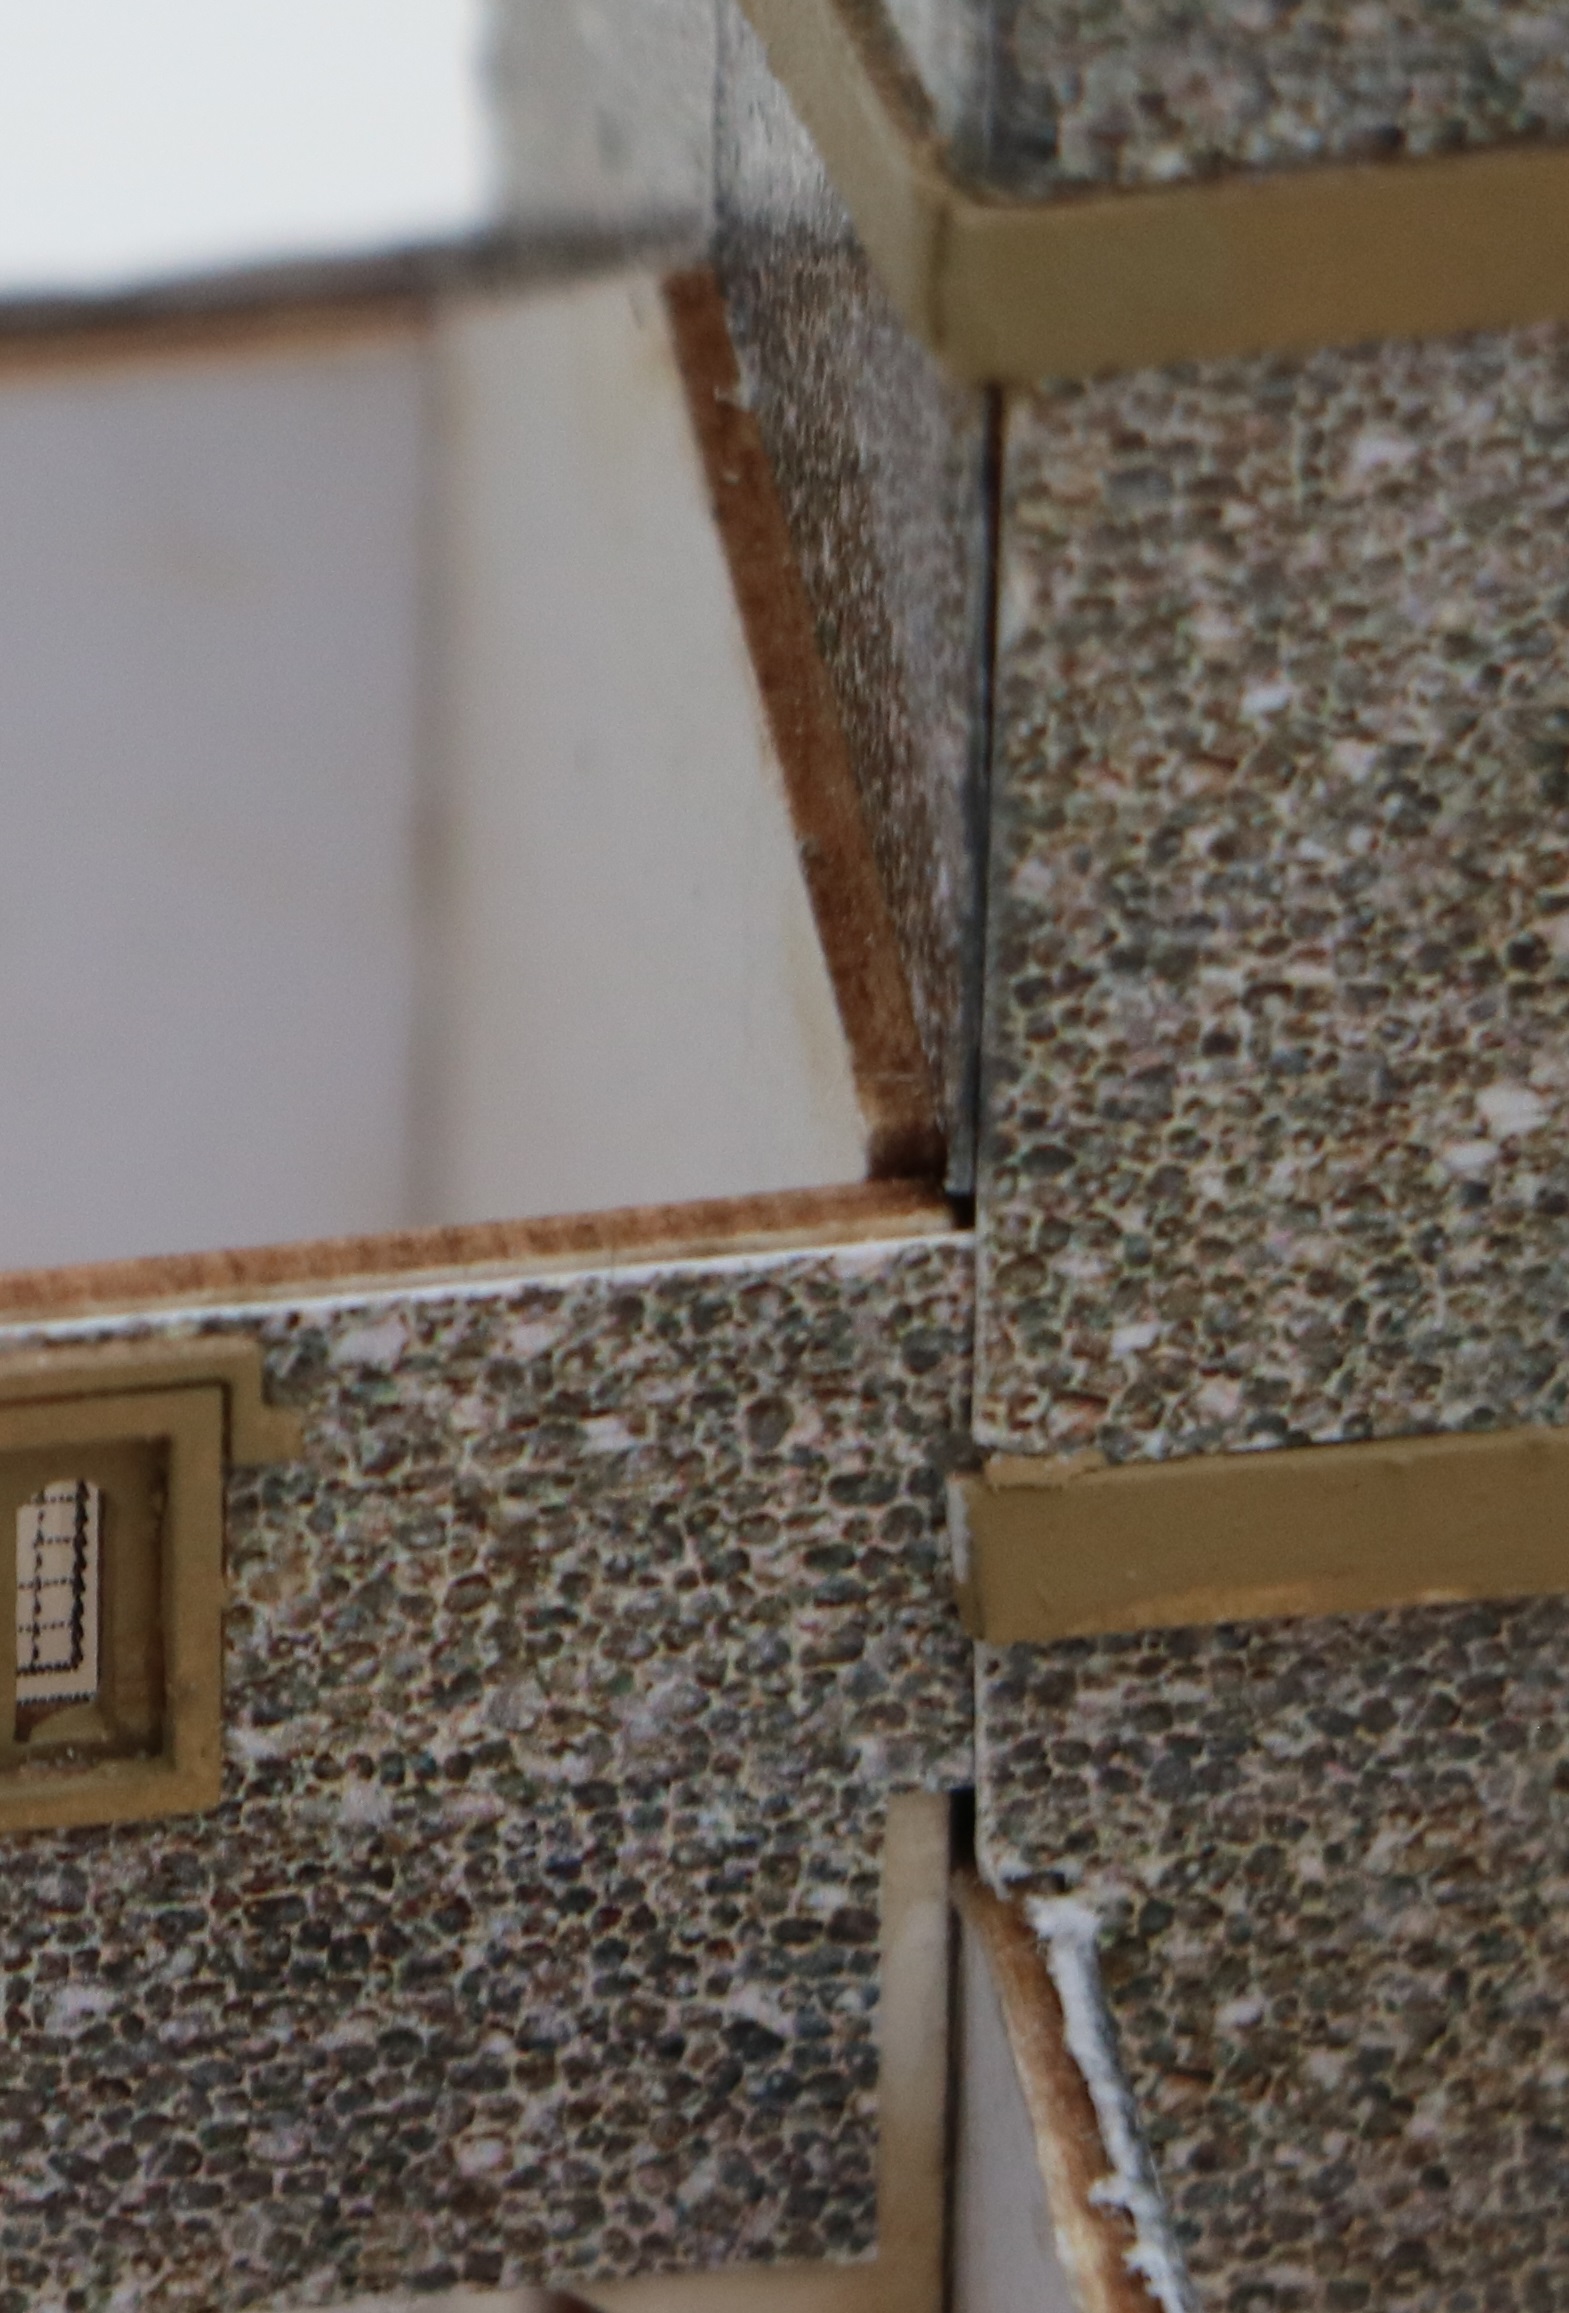
Which brings me back to the importance of accuratly cutting out the flint paper before fixing the window surrounds. Positioning the surrounds in exactly the right place is a challenging task. Especially working in this small scale. It is made a whole lot harder if the edges of the windows are sometimes obscured, covered, with paper. But more than this. The surrouds are designed and sized to leave a small rebate around the window opening. If the openings in the paper are narrower than the openings in the surrounds they will be visible in this little rebate. We are only talking millimetres here but it is still visible and ugly. Trimming after fitting is hard work. The old adage of measure twice cut once is very true in this context.
 The ugly consequences of having to peel off and refix a window surround and of trying to trim cladding paper after fixing the surround.
For the tower roof, PP suggest pieces of wire to simulate the rolls on a lead roof. I chose to use pins with tops and points clipped off. I found the rigidity better than wire. Nor did I take their advice on spreading tissue paper over the top but relied on a couple of coats of my trusty red oxide paint. After sanding out the traces this showed of the glue holding the pins I then tried out some 'suede' paint I found at the DIY superstore. I'm a big fan of tester pots of emulsion and use them a lot.
.jpg)
.jpg)
The next step is the roof. But wait! Before fixing the roof two things need to be done. The first is optional. Putting some lighting inside. Rather than go to a model shop I used a cheap christmas lighting set with a string of little LCDs. The wires go out through a hole in the base to the battery pack and switch.
The second - which is vital! - is fixing the stained glass windows. These are a classy touch from PP. Printed on clear plastic sheet, the colours are perhaps a little muted but the detail is remarkable and they are not all the same. To glue them inside I again used some NanoTac dry adhesive applied to the inside of the walls. Fixing the stained glass inside the building was a little tricky. Lining it up precisely before committing and getting adhesive on the surface was difficult. Holding the top of the little bits of clear plastic with a pair of fine tipped pliers (which I find eaier to use than tweezers) was the way to do it.
Next time? Maybe the adhesive needs to go on the surround of the clear sheet rather than on the walls? Or maybe it would be a lot easier to do before the walls are assembled into the structure - after the inside of the window openings have been painted. If this option were taken the window frames would most certainly need to be properly painted before fitting. Technically easier but more care would then be needed in assembling and painting.
At last, the roofs can go on. After first applying some roofing paper. At this scale I am content simply to use a sheet of slate texture paper without the need to cut it into strips and overlap as I did on Wallis Manor (1/76). I have two slate textures on my laptop. One bought from Scalescenes and one based on xxx and extended using Photoshop Elements. My Photoshop file has several layers with diffferent colour variants. Much as I normally like Scalescenes I chose the other one. I find Scalescenes slate roofing a little too weathered for my taste. Especially when scaled to 1/148.
Fixing the roofs is straightforward. But.... the time consuming work comes straight afterwards. Simply having a slate edge at the end of the gables looks wrong to my eye. For the full gables to the nave and the chancel I went for a parapet wall. For the top of the parapet I used a plastic 1/76 scale wall coping from a wall set sold by Wills (SS36). But it was too shallow so I added a strip of thin wood (coffee stirrer) underneath. Once fitted a bit of fine filler was needed on the joints and at the apex where the two sides joined. Paint, sand, fill, repeat. Painted the same sandstone colour as elsewhere. For the half gables at the east end of the side aisles, and for the porch gable, I opted for a thin card strip to simulate a bargeboard, painted black. It was also necessary to add some ridge tiles. Trying to put flashing where the aisle roofs joined the walls was one step too far for me.
.jpg)
Having mounted the church on a baseboard I also had to worry about constructing a churchyard. Walls, paths, tombstones, grass, a gate, a noticeboard. The walls were those in the Wills HO/OO kit cut down the middle, mounted on a timber core and topped off with some rounded filler. The gravestones are, shall we say, a little bit token. There are not enough of them and they are not detailed enough but I got to the point where I just wanted to finish.
The front path is crushed and sieved aquarium gravel and the back path finely sieved garden soil. The rough grass around the tower is old-school dyed sawdust scatter. The main grass area is 1.5mm Noch 'Meadow' scatter grass.
Crop2.jpg) Before adding the grass
Before adding the grass
So.... at the end of the build how do I feel about it? My compliments to Petite Properties. A very nice little kit. I would have prefered a parapet at the end of the roofs but if their prototype did not have one then fair enough. Assembling the kit proved to be the easy bit. Decorating and landscaping it was the challenge. The core value of the PP package and their laser cutting technology was the windows. The basic framework is something I could scratch build but the components were invaluable.
 The final product
I learnt a lot as I went along. It was the first time I had made anything at this small scale and it stretched me. Overall I'm quite happy with the outcome but I am certainly going to have another go, both at models in this size and at a church model. Overall...yes. When I start looking at the detail close up I'm very conscious of being an also ran in the modelling stakes. My weathering skills need a bit of work.
As always, e-mail Miniature Buildings at
MiniatureBuildingSite@gmail.com if you have something to add. Comments, criticisms, errors you have spotted, extra thoughts, pictures, or even complete articles for inclusion in the Miniature Buildings site are all welcome. Or if you would like to be added to my mailing list to hear when a new article is published.
David, November 2022